TLDR: Chimney leaks can cause serious structural damage if left unaddressed, but diagnosing the source requires a systematic approach starting from the top down. The most common culprits include a missing or damaged chimney cap (which lets rain directly into the flue), cracks in the concrete crown that seals the chimney top, deteriorated bricks and mortar joints that absorb water like a sponge, compromised flashing where the chimney meets the roof (one of the most frequent leak sources), and internal condensation from improperly sized flue liners. While homeowners can do a preliminary inspection from the ground using binoculars to spot obvious damage, a professional inspection is essential for accurate diagnosis and proper repair—typically costing between $160 and $750. The best defense is annual inspections and proactive waterproofing to catch small issues before they become expensive problems, and if you notice water stains or dripping near your chimney, act quickly to prevent minor leaks from escalating into major structural damage.
Chimney Leak Diagnosis & Repair Guide – Content Outline

Introduction
- Chimney leaks compromise structural integrity and require prompt attention
- 5,000+ annual chimney-related incidents reported in the US
- Systematic top-down diagnostic approach for identifying leak sources
Common Chimney Leak Causes
Top of Chimney
- Chimney Cap: Missing or damaged cap allows direct water entry into flue
- Chimney Crown: Cracks in concrete/mortar slab allow water saturation of masonry
Chimney Structure
- Deteriorated Masonry: Cracked mortar joints and spalling bricks absorb water
- Compromised Flashing: Failed sheet-metal seal at roof connection (most common source)
- Repair cost: $300-$700 for flashing
Internal Issues
- Condensation: Uninsulated or improperly sized flue liners cause moisture buildup
- Misdiagnosis: Roof leaks or wind-driven rain may mimic chimney leaks
Homeowner Action Steps
- DIY inspection: Use binoculars from ground to check cap, crown, masonry, flashing
- Professional inspection required for definitive diagnosis
- Typical repair costs: $160-$750
- Emergency measures: Bucket placement, temporary tarp coverage
Prevention & Maintenance
Proactive maintenance prevents costly structural damage
Annual inspections by certified chimney sweep
Vapor-permeable waterproofing sealants
Upgrade inadequate crowns or flashing systems
Introduction: The Drip, Drip, Drip – Understanding Your Chimney Leak
A persistent drip in your fireplace or a new water stain on the ceiling near your chimney can feel like a nightmare, and it’s a warning sign. A chimney leak can compromise your home’s structural integrity, leading to mega-costly damage if ignored. The challenge, though, is that water is deceptive, and the source of the leak isn’t always obvious. Pinpointing the exact cause requires a careful approach.
Why Your Chimney’s Health Matters
A leaking chimney is a symptom of a larger problem. Beyond water damage, structural issues can make your home unsafe. In fact, an average of 5,000 chimney-related incidents are reported annually in the US, highlighting the importance of regular maintenance. Addressing a leak promptly protects your property and ensures your chimney systems operate safely.
How This Guide Will Empower You
This guide provides a quick, definitive, top-to-bottom method for diagnosing every possible cause of your chimney leak. By understanding how each component of your chimney works, you can identify the likely culprit and have an informed conversation with a repair professional, ensuring you get the right fix the first time.
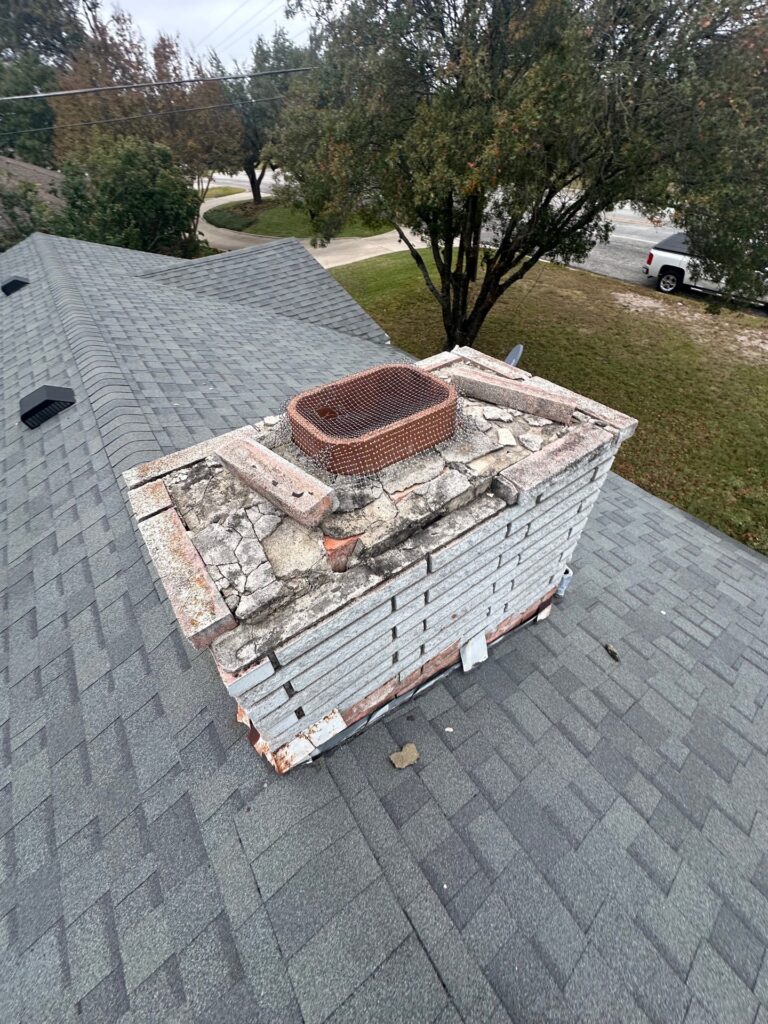
Starting at the Top: The Chimney Cap & Crown – First Lines of Defense
The highest point of your chimney is its first defense against the weather. Problems here allow water to enter the chimney structure directly, making it the logical first place to investigate.
The Chimney Cap: Preventing Direct Rainwater Entry
The metal piece covering the top opening of your flue is called the chimney cap. Its job is simple: keep rain, snow, animals, and debris out. A missing, damaged, or improperly sized cap provides a direct pathway for water to enter the flue, where it can damage liner systems and seep into the masonry.
The Chimney Crown (Flaunching): Protecting the Chimney’s Body
The chimney crown is the concrete or mortar slab that seals the top of the chimney around the flue. It should be sloped to shed water away from the masonry. Over time, exposure to weather can cause cracks to form. Water entering these cracks saturates the underlying brick and mortar, leading to damage.
The Chimney Stack Itself: Bricks, Mortar, and Flashing – Structural Vulnerabilities
If the top of the chimney is in good condition, the next place to look is the main structure and its connection to the roof. This area is constantly exposed to the elements.
Deteriorated Masonry: Bricks and Mortar Joints
The bricks and mortar that form your chimney are porous. Over years of exposure to rain, snow, and freeze-thaw cycles, mortar joints can crack and crumble. The bricks themselves can also develop cracks or begin to flake—a process called spalling. This deterioration allows the masonry to act like a sponge, absorbing significant amounts of water that eventually seep into your home.
Compromised Chimney Flashing: The Crucial Roof Connection
Chimney flashing is the sheet-metal system that seals the junction where the chimney meets the roof. This is one of the most common sources of a chimney leak. If the flashing is rusted, has loose pieces, or was improperly installed, it creates a direct channel for water to run down the exterior of the chimney and into your attic or walls. The national average for chimney flashing repair ranges from $300 to $700, making it a critical bit of item.

Internal Leaks: Condensation and Flue System Issues
Sometimes, the water originates from inside the chimney itself, not from external weather.
Condensation: When Your Flue Systems Sweat
High-efficiency gas furnaces produce cooler, moisture-laden exhaust. If your flue liner is uninsulated or improperly sized for your appliance, this moisture can condense inside the flue. The resulting water can saturate the masonry from the inside out, mimicking a traditional chimney leak.
The “Not-So-Chimney” Leak: When Water Intrusion is Misdiagnosed
Before committing to a chimney repair, it’s a good idea to confirm the chimney is actually the source of the water.
Roof Leaks Mimicking Chimney Issues
A leak from a damaged shingle, vent pipe, or skylight located “uphill” from the chimney can allow water to travel along the roof deck and enter the home near the chimney. The water stain appears next to the chimney, but the root cause is a separate roof issue.
Other External Water Sources
Water can also be driven into siding or walls near the chimney during heavy, wind-driven rain, making it appear as if the masonry is leaking. A thorough inspection of the entire area is crucial for an accurate diagnosis.
Practical Guidelines for Homeowners: What to Do Next
Once you have an idea of the potential cause, you can take clear, actionable steps.
Initial DIY Diagnostic Steps
From a safe vantage point on the ground, use binoculars to inspect the condition of your chimney cap, crown, and masonry. Look for obvious cracks, missing mortar, or dislodged metal flashing. Inside, note the exact location of the leak, as this provides clues to its origin.
When to Call a Professional: The Value of Expertise
While a ground inspection is helpful, a definitive diagnosis requires a professional. They have the safety equipment and experience to get on the roof and assess the chimney crown, flashing, and flue systems up close. Most homeowners spend between $160 and $750 for chimney repairs, and a professional ensures the repair is done correctly.
Temporary Measures for Emergency Leaks
If you have an active leak, you can place a bucket to catch the water. If safe to do so, a tarp can be secured over the chimney top as a temporary measure until a professional can assess the situation.
Proactive Prevention: Safeguarding Your Chimney’s Long-Term Integrity
The best way to handle a chimney leak is to prevent it from ever happening.
Regular Inspections and Maintenance: Your Best Defense
An annual inspection by a certified chimney sweep can catch small issues like minor cracks in the crown or failing sealant before they turn into major leaks. This proactive approach is the most effective defense.
The Power of Waterproofing and Sealing
Specialized vapor-permeable waterproofing products can be applied to the chimney’s masonry. These sealants prevent water from being absorbed by the brick and mortar while still allowing the chimney to breathe out any internal moisture. The market for chimney waterproofing services is growing, underscoring its effectiveness as a preventative measure.
Addressing Design Flaws and Upgrades
In some cases, a chimney may have been built without a proper crown or with inadequate flashing systems. Upgrading these components not only fixes a current leak but also prevents future problems.
Conclusion: Your Chimney Leak – Diagnosed and Ready for Action
Empowering Homeowners with Definitive Knowledge
By following a systematic, top-down diagnostic approach, you can move from uncertainty to clarity. Understanding the roles of the cap, crown, masonry, and flashing empowers you to identify the likely source of your chimney leak.
The Importance of Timely Repair and Prevention
A small water stain is a clear signal that your home’s primary defense against the elements has been breached. Acting quickly to repair the issue prevents minor problems from escalating into severe structural damage and costly restoration work.
Your Next Steps: From Diagnosis to a Dry Home
Use this guide to perform a safe initial inspection. Document what you see and contact a qualified chimney or roofing professional like Texas Direct Roofing & Construction. Armed with knowledge, you can ensure the right repair is performed, restoring your chimney’s integrity and giving you peace of mind – especially when you let a team like ours take the lead.